

DXP Demo Videos
Discover what you can do with Squiz DXP at a glance with these short demo videos.
Video: Visual page builder. Captions and transcript available on playback.
Visual page builder
Create stunning pages in minutes with Visual Page Builder (part of Squiz DXP) – no coding needed.
Transcript: Visual page builder
In this demo, you’ll see how content editors can rapidly create multi-language, personalized pages using templates in Squiz’s visual page builder. You’ll also see how teams can build at scale while giving admins full control over brand consistency through built-in governance guardrails.
Let’s get right into it.
The scenario
Acme’s marketing team is planning an event in five weeks. They need at least four weeks of promotion time, which puts them under pressure with only one day to build and launch the event page.
We’re about to see how Joey, a content editor, builds this page in record time using a pre-built template. But first, let’s look at how Tina, the marketing manager, created that template.
Creating the template
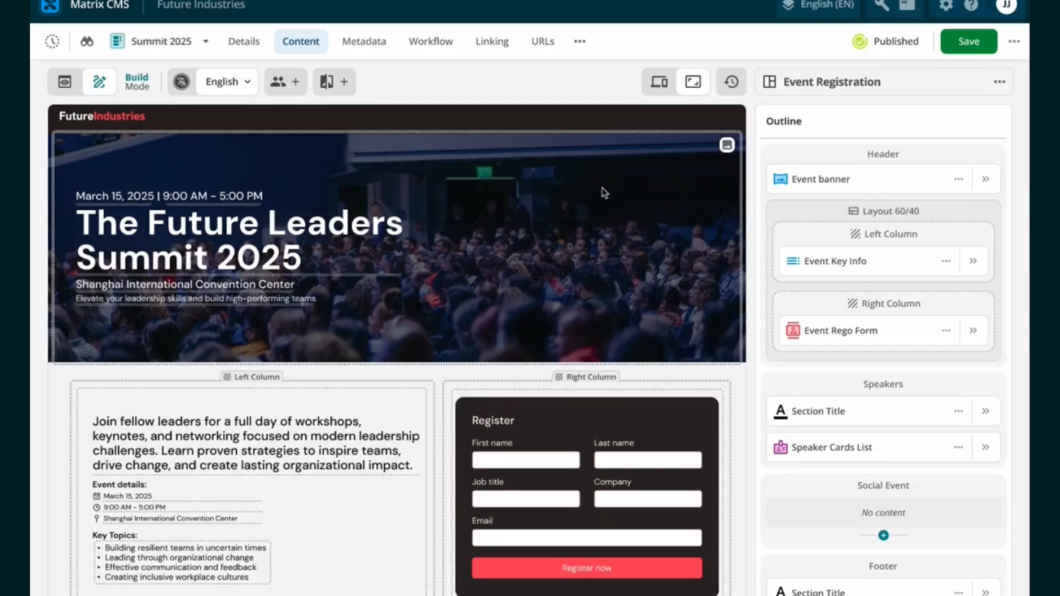
Tina has created an event page template for content editors to use. It includes a hero banner, registration form, speaker section, and event location.
The template builder uses an intuitive interface, allowing non-technical users to create templates without developer support.
For example, Tina built the form section using the layouts feature. She set a 60/40 split between two columns, rather than asking a developer to create a custom component. This gives marketing teams more flexibility to create structured sections without relying on developers.
To ensure consistency across event pages, content editors can’t reorder or delete core components within the template. However, Tina has included a “page manage zone,” which allows editors to add approved components when needed. This maintains brand control while still allowing flexibility.
Building the page
Now let’s see Joey in action.
Joey starts with a blank page. She selects from a list of available templates and applies the event registration template Tina created.
From there, she replaces the placeholder content with event-specific details. Because this is a visual page builder, she can edit content directly within the preview.
Joey also needs to add a new section for networking and social events. Using the page manage zone, she can add additional components—but only from a predefined set. In this case, Tina has limited the options to three approved components, ensuring flexibility within brand guidelines.
Joey adds a section title and an image component to showcase networking event details.
Only components within the page manage zone can be reordered or removed. Everything else remains locked, ensuring the core page structure stays consistent across all events.
Managing translations
Once the English version is complete, Joey sees that translation work is still required.
The page builder clearly highlights which language versions need attention. In this case, the Mandarin Chinese version is incomplete, as the event is targeting a Chinese audience.
Joey switches to the Chinese version and updates the hero banner and form with translated content. Visual indicators make it easy to identify which components are complete and which still need translation.
Once all components are translated, the system confirms that the page is fully complete across languages.
Personalizing content
With both language versions ready, Joey personalizes the page for different audience segments.
Using integrated customer data, she creates a version of the networking section tailored to executives. She selects the executive segment, duplicates the component, and customizes the content.
A visual indicator shows that a personalized variant has been created. Joey updates the copy to highlight an exclusive executive dinner and adjusts the imagery accordingly.
Publishing and updating
The event page is now complete—with personalized and translated content—and ready to publish within the one-day deadline.
A few days later, Joey learns that the networking event has been cancelled due to a double booking. She quickly removes the networking section.
However, the venue later confirms the event is back on. Instead of rebuilding the section manually, Joey uses version history to restore a previous version of the page.
She selects the correct version, reviews it, and restores it. Within seconds, the page is fully restored—including all networking content, translations, and personalization across both language versions.
Summary
That’s how Joey can build a complete, personalized event page in multiple languages—all within a single day and without any developer support.
Video: Advanced forms. Captions and transcript available on playback.
Advanced forms
Build dynamic forms without code, so you can remove developer bottlenecks and launch new forms in days – not weeks or months.
Transcript: Advanced forms
Today, I’ll show you how you can build dynamic forms without code, so you can remove developer bottlenecks and launch new forms in days—not weeks or months.
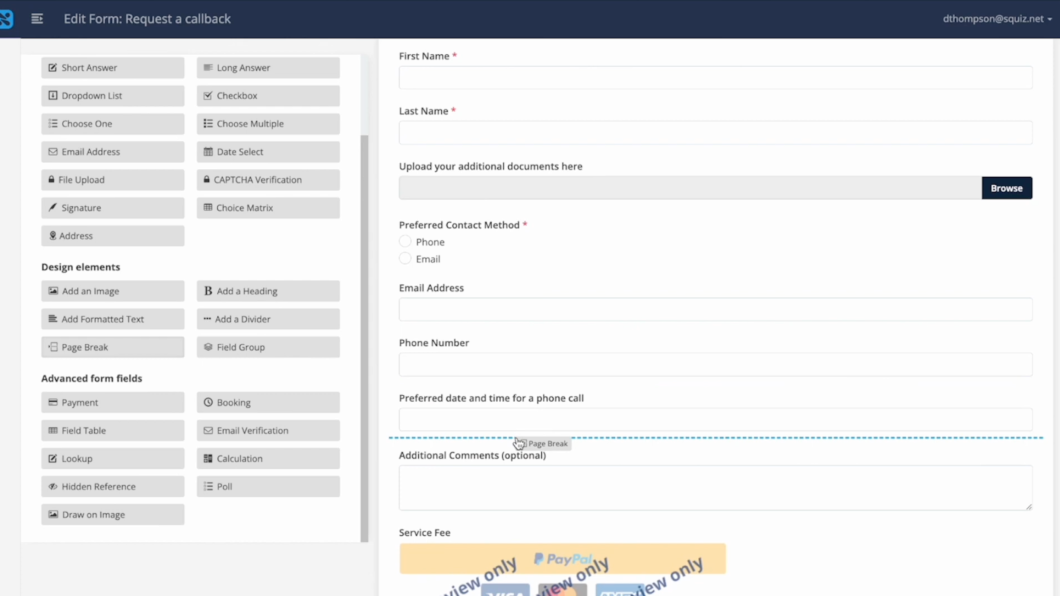
What you see here is a landing page that customers would visit to find information, with a button to request a call back. To minimise friction and make it easier for customers to self-serve, they should be able to fill out a callback request without being directed to another form page. Additionally, the request needs to be directed to the right team automatically for a timely response.
First, let’s look at our form. You get many predefined fields that you can simply drag and drop into your form. For example, let’s add a file upload field so customers can upload any additional documents they want the team to review before giving them a call back. You can also add more advanced fields such as signatures or payment fields. This helps you turn paper-based form experiences into more efficient, frictionless digital interactions.
It’s also easy to apply conditional logic. You can select a checkbox and define criteria for when specific questions should appear. In this case, we’ll configure the email field to appear only when the customer’s preferred contact method is email, and apply the same logic for the phone number field.
If you’re building a longer form, you can make it more digestible by adding page breaks, turning it into a multi-step form. Once you’ve added your fields, it’s simple to reorder them by dragging and dropping—without worrying about breaking the form.
You can also customise the form to match your brand by adding images and selecting styles. This can be done using built-in styling tools or by applying your own design system stylesheets, ensuring consistency wherever the form appears.
To encourage higher completion rates, you can allow users to save their progress and return later. This is especially useful for longer forms that require more input. You can also configure confirmation messages and style them as needed.
Once your form is ready, you can publish and share it across multiple channels. You can generate a QR code, share a link via email or LinkedIn, or embed the form directly into your website or third-party platforms using autogenerated code.
In this example, I’ll make the form accessible in two places. First, I’ll add it to the landing page using the content editor, placing it at the bottom of the page so users don’t need to navigate elsewhere. Then, I’ll add the same form to the search interface so users searching for contact information can complete it instantly.
Now, if I search for “contact,” the form appears directly within the search results, making it easy for users to fill it out on the spot.
To demonstrate the workflow, I’ll submit the form. You can see the conditional logic working—when I select a preferred contact method, the relevant fields appear. The file upload field also allows mobile users to take a photo and upload it directly from their device. The payment field is accessible within the same interface, and users can choose to save the form and complete it later via a link or email reminder.
You can turn your forms into efficient digital workflows for approvals, multiple signatures, departmental processes, or submission reviews. Workflows allow different team members to review or complete specific sections of a form.
In this example, the workflow begins with the initial submission, then notifies the relevant department that a customer has requested a call back. Conditional logic ensures the correct team is notified, and a clear call to action guides them on what to do next.
When the team reviews the submission, they can see the form fields in a read-only state, while internal fields are available for updating status or triggering additional workflow steps. This helps streamline processes and improve customer satisfaction by ensuring timely and efficient handling of requests.
Once submissions are collected, all forms and responses are centralised in a dashboard, making them easy to manage. You can also send response data to external systems using Squiz integrations or your own workflow engine.
In this example, form submissions are routed to a CRM like Salesforce, allowing you to manage and nurture customer relationships effectively. Because the Squiz DXP is composable, you can easily integrate with your preferred CRM or third-party platform.
With Squiz Advanced Forms, you can build dynamic, brand-consistent forms quickly—without relying on developers. Workflows ensure each request is routed to the right team, helping improve response times and overall customer satisfaction.
There’s so much more you can do with forms, so if you’d like to learn more, book a call with our team.
Video: Integrations. Captions and transcript available on playback.
Integrations
Easily create and manage integrations to share data across all your systems with our intuitive interface.
Transcript: Integrations
Note: Squiz Integrations is a capability of Squiz DXP and not a standalone module.
Hi, I'm Davila. In this video I'm going to show you how easy it is to use Squiz integrations to connect systems, content sources, and business applications. You'll see how you can replace fragile point-to-point integrations with low code, secure and robust integrations. Using our IPAs, you'll have access to branded connectors that allow your entire development team to securely share credentials to many third party capabilities that you're using.
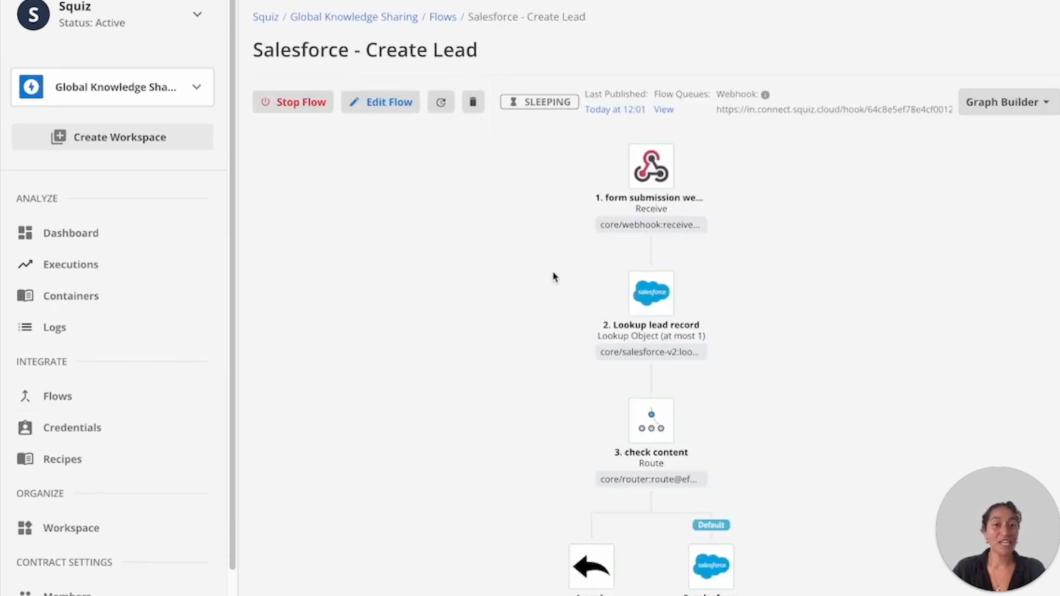
Here, I'll select the Salesforce connector. This is where you can securely create new credentials with easy authentication methods that will take you straight into Salesforce. Once you've set up a credential, the rest of the team can save time by reusing it for integrations they're building. All of your integration flows are in one place where you could manage them all and govern how you share data across all of your systems with the intuitive interface.
Creating new integrations is simple. Simply create your new name, choose how it'll be triggered, and begin adding steps to receive or send data between your third party applications. This is how you reduce reliance on developers and minimize mistakes with low code integrations that are easy to use.
That's because we help your developers work like we do to build flows quickly. You can also speed up your development work with recipes, which are pre-made automation flows. This will greatly reduce your effort and cost from the initial build to future projects. I'll activate this recipe for Salesforce and you can see these two flows were created.
And I'll open one up, and now we can see it has been set up with the multiple steps and multiple paths that I need to create a new lead in Salesforce from a form submission. Your integration builds can be shared across your team using workspaces where you can define the members who have access to your credentials, recipes, and flows.
You'll have one place to view what integrations are running in your workspace and when you get a snapshot of each individual execution, and you can walk through each step to see the logs and errors for that particular timestamp. Squiz integrations are resilient with managed error handling that you can customize within your flows, and it provides scalable performance to ensure your integrations are always up and running.
Reach out to the Squiz sales team if you want to book a demo to see what else Squiz DXP can do for your organization.
Video: Digital Asset Management (DAM). Captions and transcript available on playback.
Digital Asset Management (DAM)
One library for all your images, videos, and documents, seamlessly embedded in your page-building workflow.
Transcript: Digital Asset Management (DAM)
Advanced Forms: an integrated capability of Squiz DXP.
In this demo, I’ll show you how Squiz DXP makes it simple for content authors to incorporate digital assets into their content—and how web managers can confidently manage and govern assets across the platform.
Squiz DXP includes built-in digital asset management (DAM) capabilities within the CMS. If you’re using a third-party DAM, Squiz can also integrate with it directly, making your assets easily accessible within the CMS for content editors.
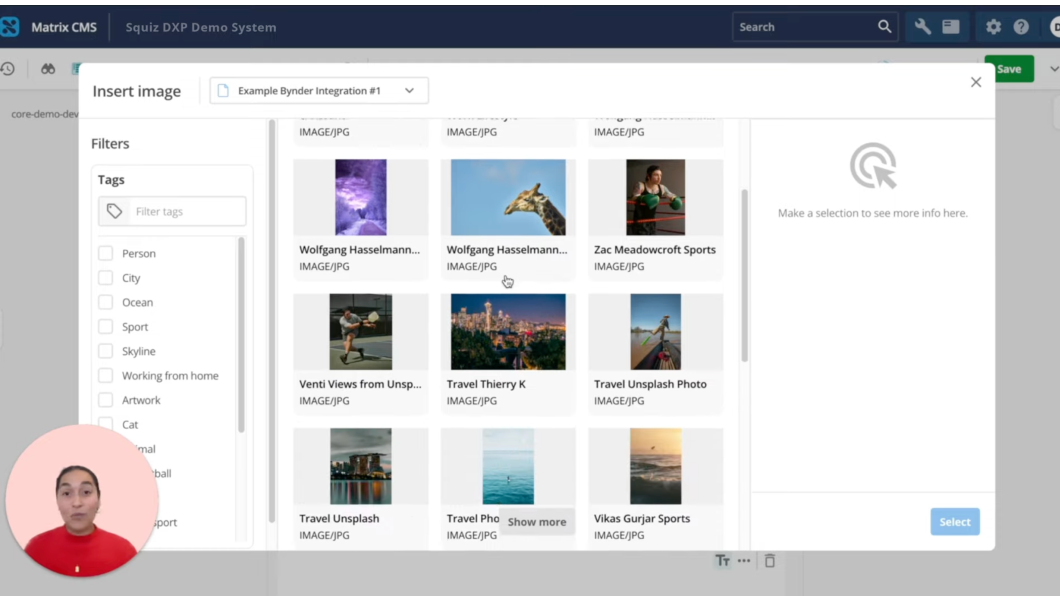
For this demo, we’ve integrated with Bynder using a pre-built integration. These assets appear automatically in the page builder, creating a seamless, centralized experience. If users aren’t logged into Bynder, they’ll be prompted to sign in, ensuring permissions are respected based on your DAM settings.
This guarantees that only authorized users can access and add images or media, helping to maintain security and compliance. When assets are updated or removed in your DAM, those changes are automatically reflected in the CMS, so content editors always see the latest, approved assets.
Editors can also take advantage of filtering capabilities from the DAM to quickly find the right asset for their needs.
Built-in DAM capabilities
If you prefer to manage your digital assets directly within the CMS, Squiz also offers built-in DAM functionality.
Let’s take a look at image management.
Here’s an example of an image uploaded to the CMS. Images can be modified directly using the built-in image editor, allowing you to crop, resize, or adjust them as needed.
Squiz also supports image variations, which can be created manually or generated automatically on upload. This ensures images are optimized for different use cases across your site without requiring manual resizing.
Metadata can also be managed efficiently. Embedded image data can be captured on upload, and required fields—such as descriptions or copyright information—can be enforced before publishing.
A preview screen allows you to review each asset, complete with an accessibility checker that flags missing alt text or other key requirements, helping you maintain compliance.
Asset governance and visibility
Understanding how and where assets are used is essential for governance and brand consistency.
With Squiz, you can track usage for any asset, whether it’s an image or another type of content file. For example, you can see exactly where a specific image is being used across the platform.
Squiz also supports additional file types, including video. The preview screen allows you to play videos directly, so you can review both visuals and audio. As with images, metadata can be automatically extracted to streamline asset management.
Summary
Squiz’s built-in DAM capabilities support a wide range of content needs. And if you’re already using a third-party DAM, pre-built integrations make it easy to connect your existing asset repository.
This ensures your teams can create and manage content efficiently, while maintaining strong governance and consistency across all digital assets.
Video: Optimization and journey mapping. Captions and transcript available on playback.
Optimization and journey mapping
User journey mapping shows you exactly how people move through these key processes on your site. You'll discover where users get stuck, how long they spend on each page, and what devices they're using.
Transcript: Optimization and journey mapping
In this demo, I’ll show you how non-technical teams can streamline important user journeys and boost conversions using user journey mapping and A/B testing in Squiz DXP with capabilities that are integrated as part of the Digital Experience Platform.
The scenario
We’re part of the marketing team at TNG Lawyers, and we’re trying to increase signups for a law conference.
First, let’s look at the user journey we want to track. This helps us understand how users are engaging and identify any drop-off points that need optimization.
The journey starts with an email invitation. When users click the call to action, they arrive on the conference landing page, where they can view event details and speaker information.
From there, they click “Register now” to go to the registration page, where they complete the form. After submitting, they reach a confirmation page, where they can download an information pack.
Tracking the journey
Now let’s use user journey mapping in Squiz DXP to track how users move through this process—from the email through to registration.
Within the DXP, I navigate to the Optimization capability and open user journey mapping. Here, I can build the journey step by step.
I start by naming the journey and adding a description. I also choose to track interactions across all devices, including desktop and mobile.
Next, I define each step:
Step one: the landing page, tracking page views
Step two: the registration page, also tracking page views
Step three: form submissions, using the relevant URL
This allows us to track how many users progress through each stage—and where they drop off.
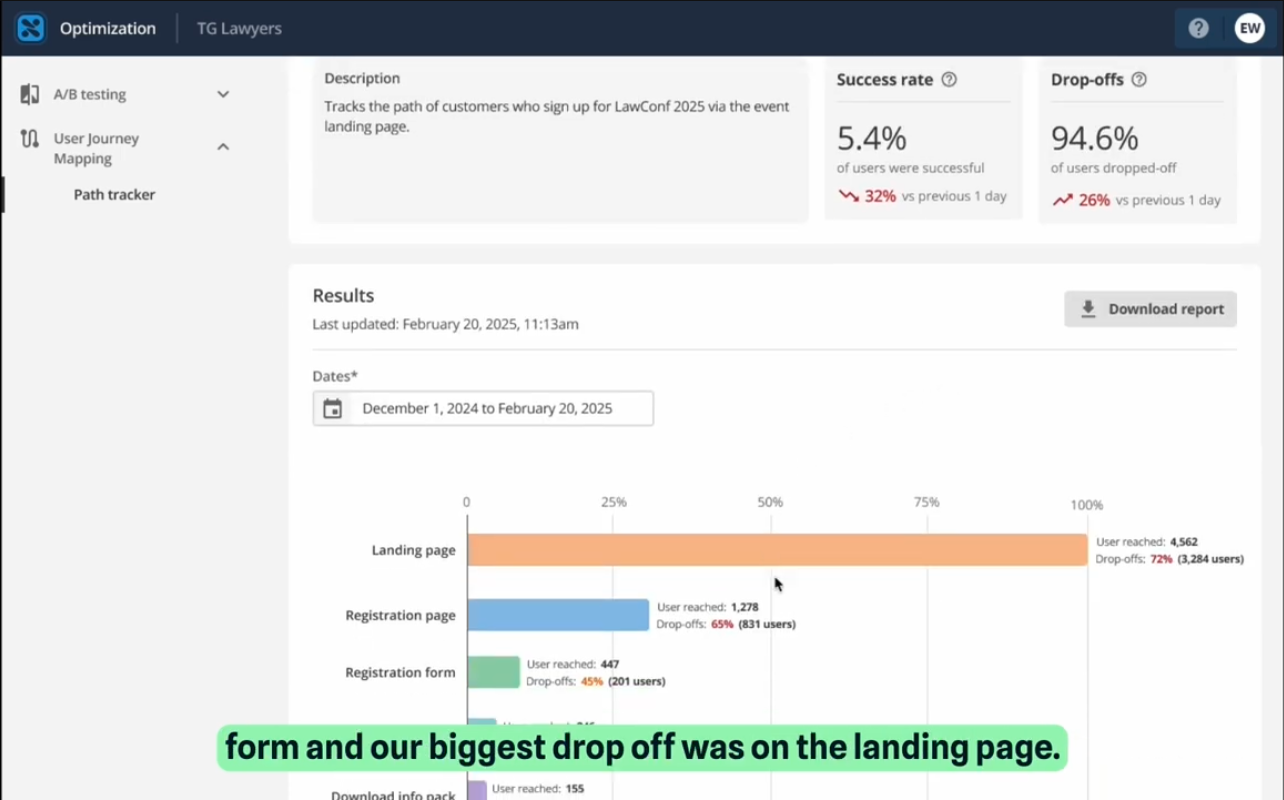
Analyzing performance
A couple of weeks later, we review the data.
We can see that only 5.4% of users completed the form, with the biggest drop-off occurring on the landing page.
Within the analytics, we can explore detailed metrics such as drop-off rates, users reached, and average time on page across different devices. We can also see which browsers, locations, and marketing campaigns users are coming from.
These reports can be downloaded and shared with stakeholders for further analysis.
Improving conversions with A/B testing
Now that we’ve identified the landing page as the biggest drop-off point, the next step is to improve its conversion rate.
Back in the Optimization capability, I open A/B testing to create a new experiment.
For this test, I focus on the call-to-action banner. I add a test name and description, define the domain, and set up two variants:
The original banner
A more urgent, time-sensitive version
Success will be measured based on the number of clicks. I choose to start and end the test manually.
Running the experiment
Next, I open the landing page in the visual page builder and apply the A/B test.
I connect the test to the banner component and duplicate the existing content to create the second variant. Then, I update the messaging to make it more urgent.
An icon indicates that the component is part of the test. Once the changes are published and the test is live, we let it run for a couple of weeks.
Results and impact
After reviewing the results, we can see that the urgent version—variant B—achieved a higher conversion rate.
We implement variant B on the landing page and return to user journey mapping to measure the impact.
The completion rate increases from 5.4% to 7.3%.
Summary
With real-time insights into how users interact with your most important journeys, you can identify drop-off points, test improvements, and continuously optimize performance.
This allows you to streamline user journeys, boost conversions, and ensure your website helps users achieve what they came to do.
Video: Keyword Search. Captions and transcript available on playback.
Keyword Search
How you can deliver relevant, accurate search results across all your content sources.
Transcript: Keyword Search
Hi, I’m Davila. In this video, I’ll give you an overview of Funnelback, the search engine within Squiz DXP, and walk you through several of its features. You’ll see how it helps users discover content more effectively across your digital platforms.
Managing search in Funnelback
Funnelback search is managed through a browser-based dashboard, accessible from desktop or mobile.
From here, you can configure search results pages and manage the index for each of your data sources.
Let’s start by looking at how to add a data source.
Funnelback includes a range of pre-built data source types, including websites, databases, directories, and social media platforms. This allows you to make all of your content searchable, regardless of where it lives or what format it takes.
In this example, we’ll crawl and index a website. Funnelback guides you through the process step by step. You enter a name for the data source, paste in the website URL, and then choose whether to exclude any content. For example, you might decide not to crawl events pages or certain non-HTML file types.
You can then run a full update immediately so the content is indexed and ready to use.
Once your content has been indexed, you can add the data source to an existing search package—or create a new one if needed.
Configuring the search experience
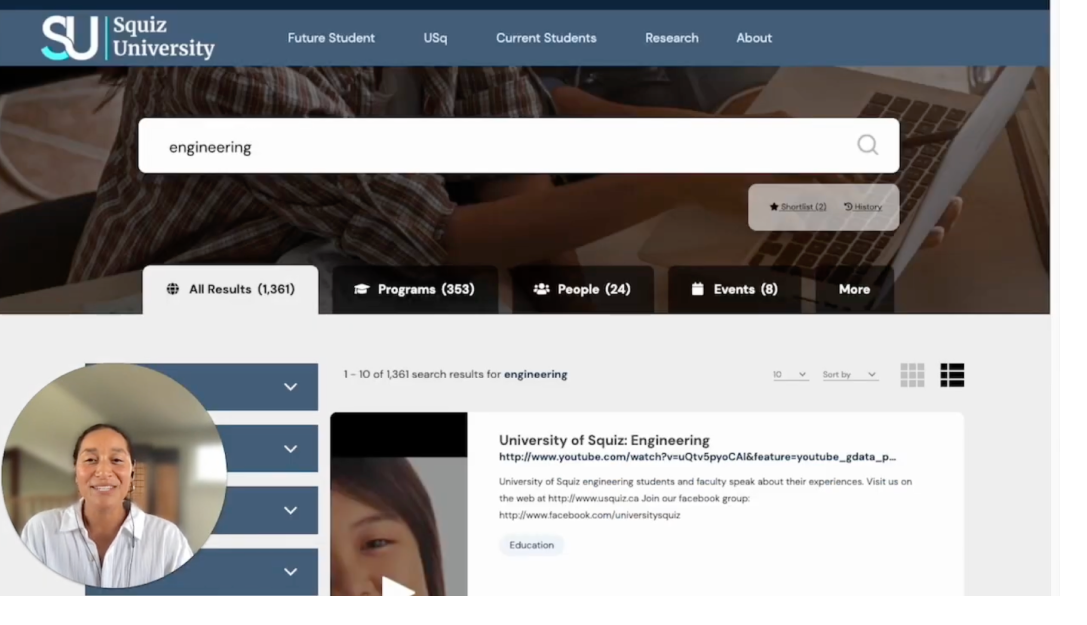
Next, you choose the search results page you want to edit and display your data on.
From here, you can update the template, adjust page configurations, or review analytics. In this example, we’ll search for “engineering” to see how the results page works.
Squiz provides ready-made search interface templates that help you get started quickly. These include built-in capabilities such as spelling correction, word expansion, accurate result ordering, and more.
You can also configure the interface to segment content into tabs, making it easier for users to navigate across different content types. Filters can be added to refine results based on metadata such as date, format, or other indexed attributes.
Search results can also be displayed differently depending on the content type. For example, a website page may appear differently from a video result or a course listing, based on the metadata available.
If users don’t find what they need on the first page of results, Funnelback can also suggest related searches. These are dynamically generated topics connected to the original query, helping users refine or expand their search more quickly.
Autocomplete can also be configured to provide real-time suggestions as users type. These suggestions can be simple keywords or richer result previews, such as people, programs, or other specific content types.
Users can also save results they’re interested in and return to them later using shortlist functionality. Search history is also retained, allowing them to revisit previous searches and clicks.
Search analytics
Funnelback includes built-in search analytics with every search experience you create.
This gives you instant visibility into user behavior and helps you understand what people are searching for.
You can review monthly summaries showing searches, clicks, and click-through rates. You can also dive deeper into specific queries to identify the most common search terms.
Search analytics also highlights pain points, such as searches that return zero results. This helps you understand what users are looking for but can’t currently find.
You can see which results are being clicked most often, helping you decide which pages need to stay current and relevant. If you’ve configured search filters, you can also track how frequently they’re being used.
A locations map shows where your search users are coming from, based on IP data, and these reports can be exported if needed.
Trend alerts notify you when there are sudden spikes in search activity. This helps you identify emerging topics quickly and take action, whether that means adding synonyms, promoting a result, or reviewing what users are seeing for a particular query.
Together, these insights help you improve the search experience over time and increase user satisfaction.
Synonyms
A common search challenge is that different audiences use different language.
Instead of changing your content to match every possible term, Funnelback allows you to create synonyms on the fly so users still find the right information.
This is especially useful for acronyms, regional differences in language, or common misspellings that aren’t covered by standard spelling corrections.
For example, you might map “coding” to “programming” and “computing.” Before publishing the synonym, the search results may only return content directly related to coding. After publishing it, the results expand to include programming and computing content as well.
This ensures users receive the right information regardless of the language they use.
Curator
When you need to adjust search results quickly without changing the source content, Funnelback’s Curator tool gives you full control over what users see.
Both technical and non-technical users can use it to reorder results or display specific content for particular queries.
For example, you might create a rule so that whenever someone searches for “engineering,” a specific engineering course appears at the top of the results.
You can also add a call to action above the results—for example, highlighting engineering scholarships with a link and custom message. This call to action can point to any page, whether it’s in the search index or not.
Curator makes it easy to control the search experience without technical overhead or lengthy training.
Tuning
One of Funnelback’s key differentiators is the ability to tune the ranking algorithm.
Every organization has its own content structure and business priorities, so a one-size-fits-all ranking model often isn’t enough.
Funnelback provides a non-technical interface that lets you create a tuning set by defining keywords and the URLs that should rank highly for them.
For example, you might create training data for the keyword “events” by identifying the most relevant pages you want returned.
Once enough training data is in place, you can run a tuning process. Funnelback analyzes features such as metadata, dates, and URL structures to determine what ranking signals matter most for your organization.
After the tuning run, you’ll receive an overview of how much your search relevance could improve if the updated ranking model is applied.
This is especially useful when you want to improve overall search performance rather than manually curating individual results.
Summary
This is just a snapshot of what you can do with Squiz Search and its underlying engine, Funnelback.
From indexing content and building tailored search experiences to analytics, synonyms, curation, and ranking optimization, Funnelback gives you the tools to create a more useful and effective search experience for your users.
Book a demo with our team to explore more features and see how Squiz Search can support your digital experience goals.
Video: Conversational Search. Captions and transcript available on playback.
Conversational Search
Turn information seekers into action takers. Instantly answer user questions with AI-generated answers based on content you control.
Transcript: Conversational Search
In this demo, I’ll show you how Squiz is transforming search into a powerful question-and-answer experience using AI—delivering instant, personalized answers directly from your content.
Traditional search provides helpful links and valuable pages, but users still need to click through to find the answers they’re looking for.
With AI-powered question-and-answer search, Squiz turns search into a true answer engine.
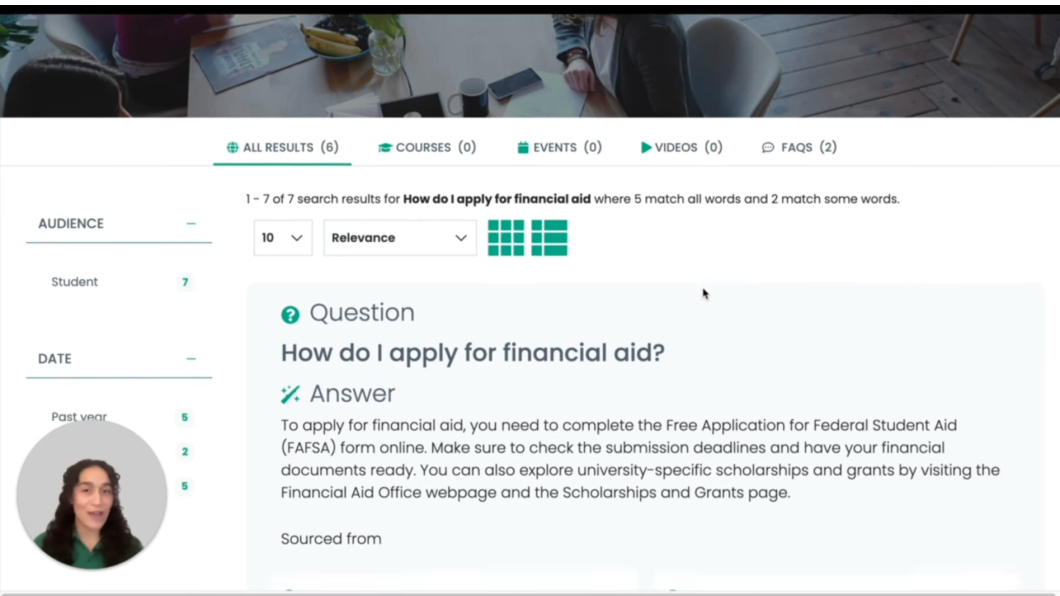
From search results to instant answers
Now, when users ask a question, they receive an instant AI-generated response created directly from your content.
This isn’t a generic answer—it’s your organization’s knowledge, made accessible in seconds.
By integrating a large language model directly into Squiz Search, we use retrieval augmented generation to ensure responses are grounded in your content and reflect your organization’s expertise.
Flexible search experiences
You can continue to offer a traditional search experience, complete with links, filters, and faceted navigation.
Or you can transform how users discover content by creating a dedicated conversational experience. You still have the option to surface standard search results alongside AI-generated answers.
You can also embed this capability into a chatbot, allowing users to access AI-powered search from any page across your site.
Powered by your existing search
For those already using Squiz Search, your existing indexing remains the foundation.
All of your content—whether from third-party systems or within the Squiz DXP—is still indexed and aggregated into a single source.
The difference is what happens next.
When a user asks a question, the top-ranked search results are passed to the language model, which generates a tailored response based on:
The user’s query
Your content
User behavior signals, such as location, on-site interactions, and defined audience segments
This creates a truly personalized response.
A conversational experience
Users can still explore the original source content for more detail, but they can also ask follow-up questions—creating a natural, conversational experience with your content.
This removes the need to search across multiple pages or documents. Answers are delivered instantly, making the experience faster, more intuitive, and more engaging.
Summary
Conversational AI Search is fully integrated within the Squiz DXP.
It builds on your existing search capabilities to unlock AI-driven innovation—while giving you the tools to govern and manage these experiences effectively.
Video: Personalization in visual page builder. Captions and transcript available on playback.
Personalization in visual page builder
Unify fragmented data to provide high-converting, personalized online experiences.
Transcript: Personalization in visual page builder
In this video, I’ll show you how simple it is to create personalized experiences using Squiz DXP’s visual page builder. Personalization and Visual Page Builder are capabilities of the Squiz DXP and part of an integrated platform - not standalone modules. Personalisation isn’t just a nice-to-have feature—it’s a powerful way to boost engagement, build trust, and ultimately drive conversions. And with Squiz, it only takes a few clicks.
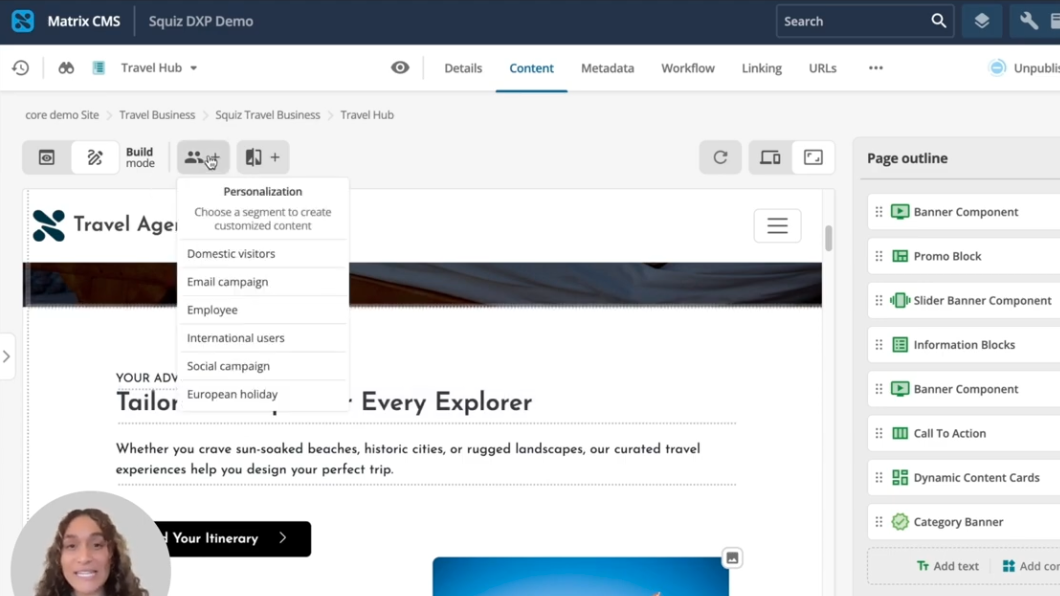
Let’s take a look at our travel site. Right now, we’re viewing the default version of the page, which is what any visitor would see. However, we have several different audiences, and we want to tailor the experience to better match their interests.
With Squiz DXP, personalising content is straightforward. You can easily select and apply audience segments so that the right users see the most relevant content. For example, we know that users arriving from our European holiday campaign are likely interested in trips to Europe, so we’ve created a segment to capture these users.
Now, any changes I make while viewing this segment will only apply to users within that group. First, we’ll personalise the main call to action for our European holiday audience. Customising content is simple—you just decide which sections of the page you want to tailor for each audience.
To speed things up, I’ll duplicate the existing component as a starting point, then update the title and button to better target this audience.
Personalisation isn’t just about text—it’s also about delivering the right visual experience. With built-in asset management, content teams can quickly swap out images to match each segment’s interests. I can browse existing images uploaded by the team or search for new ones that better fit the context.
A common challenge marketers face is not knowing how personalised content will look until it’s live. But with Squiz, you get instant visual feedback as you edit.
After making a few quick updates, our European holiday audience now sees visuals that bring their dream trip to life—like a picnic in Paris, scenic mountain trails, and iconic canals. Because you’re editing directly on the page, you can immediately see how your changes will appear to each segment, giving you full confidence before publishing.
You can also easily compare different versions of the page. This is the default experience, and when we switch back to the European holiday segment, the content updates instantly to reflect that audience’s interests.
This flexibility allows you to fine-tune both messaging and visuals without needing additional tools or complex workflows.
Of course, effective personalisation relies on understanding your audience—specifically their behaviour and attributes—and then grouping them into the right segments. That’s where the Squiz Customer Data Platform (CDP) comes in.
To create the segments used in the page builder, we start by capturing events. Events represent user actions and behaviours on your site, as well as their attributes. These events are then used to group users into meaningful segments.
Let’s begin by capturing an event. You can track real-time behaviours such as pages viewed, how users arrived on your site—whether from Google search, ChatGPT, social ads, or email campaigns—and even their location. You can also enrich this data using your CRM or other marketing tools to create highly targeted segments.
In this example, we want to capture visitors coming from our European travel campaign, so we track users with a UTM campaign tag equal to “Europe.”
Next, we apply this event to our European holiday segment. Segments allow you to group audiences based on defined rules. You can create simple segments using a single event or combine multiple events for more advanced targeting.
In this case, our European holiday segment already includes users who visit Europe-related pages two or more times. We then enhance this by including users who arrive via the campaign UTM parameter we defined earlier.
This built-in integration between the Squiz Customer Data Platform and the visual page builder makes it easy to capture interest from multiple sources and deliver personalised experiences without complex setup.
Your audience isn’t one-size-fits-all—and your content shouldn’t be either. Because Squiz combines personalisation and content editing in a single platform, your team can launch campaigns faster, reduce reliance on developers or third-party tools, and deliver tailored experiences based on real-time engagement.